Jump Starters
V4500 Plus
1. Function Usage
1.1. How long does it take to fully charge the product?
The charging time depends on the power of the charger you use. It takes approximately 2.5 hours to fully charge the device using a PD45W charger.
1.2. Can this product be used to test lithium iron phosphate batteries?
No, the product currently does not support testing of lithium iron phosphate batteries.
1.3. Any suggestions for battery testing?
Before testing the battery, you should fully charge it first. Then let it sit for at least 6 hours before testing.
1.4. What should I do when my vehicle fails to start?
Please ensure that the V4500 Plus has a battery level above 50% and switch to BOOST mode to start your vehicle.
1.5. Why does the Bluetooth connection fail?
Before connecting via Bluetooth, some necessary permissions (such as location) must be granted. The Bluetooth connection must be established within the app. If you have already established a Bluetooth connection with the device through your phone's system settings, please revoke it first, then try to establish the Bluetooth connection within the app.
1.6. If the car battery is disconnected, can the vehicle be started by directly connecting the clamps to the car's positive and negative terminals?
Simply turn on the BOOST mode.
1.7. How to charge the V4500Plus
Charge the V4500Plus via the USB-C port using a PD100W cable and a PD45W charging adapter. During charging, the 【IN】 icon on the V4500 Plus screen will light up, and if the charging speed exceeds 18W, this icon will also light up.
Note: The maximum output power of the PD100W cable is 100W. You can choose to purchase a charger adapter that supports PD100W to enjoy an ultra-fast charging experience.
2. Fault Issues
2.1. Why does the vehicle start for a while before I get in, but then shuts off once I'm in the driver's seat?
If the vehicle has already started, it indicates that the equipment is functioning properly. If the vehicle shuts off automatically, it is recommended that the customer checks if there is any fault with the vehicle or if it has entered anti-theft mode.
2.2. At a low temperature of -10 degrees Celsius, with the product's battery at 25%, why does the fault icon light up when starting the engine?
This is a normal phenomenon because the product has been in a low-temperature environment for a long time, causing the internal activity of the battery to decrease and the internal resistance to increase. At the moment of startup, the battery voltage drops rapidly, triggering a low battery alarm. When using the product in environments below 0 degrees Celsius, it is recommended to adopt the following three methods to resolve this issue.
Multiple startups. Once the internal temperature of the battery rises and the battery activity is restored, the alarm should be eliminated.
Try to keep the battery level above 80% under low-temperature conditions in winter.
In cold weather, please store the product in an environment above 0 degrees Celsius. Only move it to a low-temperature environment when necessary for use.
V2200Air
1. Function Usage
1.1. What do the indicator lights on the V2200Air jumper clamps mean?
The indicator lights on the V2200Air jumper clamps, from left to right, are the Tool Ready Indicator and the Error Indicator:
- Tool Ready Indicator: It lights up in a steady green when the jump starter is ready.
- Error Indicator: It lights up in a steady red when reverse polarity, short circuit, overheating, or improper connection is detected. (The internal buzzer will also sound.)
Note: If the jump starter is correctly connected but neither the Tool Ready Indicator nor the Error Indicator lights up, it may be because the vehicle battery voltage is below 3V. Try starting the vehicle in BOOST mode.
1.2. How long after starting the V2200Air will it automatically shut down if not used?
If there is no operation within 20 seconds after starting the V2200Air, it will automatically shut down.
1.3. Can the V2200Air start a 24V battery?
The V2200Air is only suitable for starting vehicles with 12V lead-acid batteries.
*The V2200Air offers two modes: Start Mode and Boost Mode.
1.4. How to use Boost Mode with the V2200Air?
If the vehicle cannot start in Jump Start mode,
it may be because the voltage between the jumper clamps is below 3V. You can try BOOST mode. In BOOST mode, the V2200Air will automatically output for 30 seconds. In this mode, it is strictly prohibited to directly connect the positive jumper clamp to the negative jumper clamp. Otherwise, a strong current will be generated, which may cause damage, injury, or even death.
*The operation of BOOST mode is similar to Jump Start mode. You need to press the BOOST button on the jumper clamp cable to enable BOOST mode.
1.5. Recommended Pressure Range for V2200Air Usage
- Cars: Car tires 2.2~2.8 bar
- Motorcycles: Motorcycle and electric motorcycle tires 1.8~3.0 bar
- Bicycles: 12/14/16-inch bicycle tires 3050 PSI; 20/22/24-inch bicycle tires 4050 PSI; 26/27.5/29 bicycle tires 4565 PSI; 700C clincher tires 100130 PSI; 700C tubular tires 120~145 PSI
- Sports Balls: Basketball 79 PSI; Football 816 PSI; Volleyball 45 PSI; Rugby 1214 PSI
1.6. How to Use the Emergency Lighting on the V2200Air
The V2200Air is equipped with an LED flashlight. After powering on, you can press and hold the switch button for 3 seconds to turn it on. The LED flashlight also has strobe and SOS functions. You can toggle these by lightly pressing the switch button.
To turn off the LED flashlight, press and hold the switch button for 3 seconds.
1.7. How to Manually Shut Down the V2200Air/Does the V2200Air Automatically Shut Down?
After powering on the V2200Air, you can press and hold for 7 seconds to shut it down. Note: After powering on, if there is no operation within 20 seconds, the V2200Air will automatically shut down.
1.8. How Long Does It Take to Fully Charge the V2200Air?
The charging time for the V2200Air depends on the charger used. For example, using a PD45W charger, it takes approximately 1 hour.
1.9. Why is the DC output voltage as high as 16.8V? Will it damage my 12V electronic devices?
The DC output voltage ranges from 13.2V to 16.8V, increasing with the battery charge level. However, most 12V devices can withstand up to 18V, so it will not cause damage.
1.10. Any Suggestions for Inflating Low-Pressure Items?
When inflating low-pressure items such as footballs or inflatable boats, use the sports ball inflation mode. In this mode, the motor speed is lower, preventing damage to the item being inflated.
1.11. How Long Does It Usually Take to Inflate a Tire?
Generally, it takes about 5-6 minutes to inflate an empty car tire. The specific time depends on the tire's capacity and the load it needs to support.
1.12. Can I Use the Inflator in Cold Environments?
The discharge capacity of the battery decreases in cold environments. It is recommended to store the device indoors or fully charge it before use. In cold conditions, the battery may not effectively start the car or inflate items due to insufficient power.
1.13. Is the USB-A Output Port Fast Charging or Regular Charging?
The USB-A output port is a regular mode output port (5V3A), not a fast charging port.
2. Fault Issues
2.1. Why does the red error indicator light up during use?
This may be due to frequent activation of the device within a short period, causing the power unit to overheat. Please wait for 20 minutes before trying again.
2.2. Why is there no power when using V2200Air to charge both a computer and a phone simultaneously?
When using the Type-C port to charge a computer and the USB-A port to charge a phone simultaneously, both ports stop outputting, making it impossible to charge both devices at the same time. The reason is that most computers cannot be charged with 5V. However, if a computer can be charged with 5V and another device is charged simultaneously, it may lead to an overcurrent situation, triggering overcurrent protection. Similarly, the DC port cannot output simultaneously either.
V2200 Plus
1. Function Usage
1.1. How to activate BOOST mode on V1500 and V2200PLUS?
Hello! Briefly press the BOOST button on the side of the clip wire. A steady green status indicator light means the BOOST mode (forced output mode) is activated. Then, start the vehicle as soon as possible within 30 seconds. If no action is taken within 30 seconds or the vehicle starts successfully, the BOOST mode will automatically turn off, and the green LED light will go out.
1.2. How to turn off V2200Plus?
When the device is not used for a long time, it will automatically shut down.
1.3. The V1500 and V2200PLUS consume power too quickly during emergency starts. (Phenomenon: It dropped from 100% to 50% after only 3 starts.)
The number of starts is related to the engine displacement (load), ambient temperature (discharge capability), and battery charge (discharge duration).
Note in usage: When the battery clips are attached and the green light is steady, the emergency start power is ready, and you can start the car. There is no need to use the BOOST mode.
1.4. Can I check the real-time voltage?
Click the bottom right corner of the APP homepage to view the real-time voltage of the vehicle's battery. If Bluetooth is connected before starting the vehicle, a start report will be automatically generated when the vehicle starts successfully.
1.5. How to connect Bluetooth with V2200Plus?
Connect the V2200Plus control box to the battery.
Please have the user open the Bluetooth settings on their smartphone and check if there is any Bluetooth device in the list that starts with "JumpSurge". If so, have the user delete the device from the phone's Bluetooth settings.
Enable location permissions on the smartphone, then click "+" in the BatteryLab software to search for devices, and click to connect.
2. Troubleshooting
2.1. Why can't the app detect or connect to Bluetooth?
Please observe whether the Bluetooth icon on the charging screen is blinking. If it is blinking, turn on the location function and the phone's Bluetooth function (this is necessary, otherwise you will not be able to search for nearby Bluetooth devices), then open the app, click the icon at the bottom of the app, enter the device search page, and connect. If the Bluetooth icon is steady, it means the device has been connected by another phone.
V1500
1. Function Usage
1.1. How long does it take to fully charge the V1500?
The time required to fully charge the V1500 varies depending on the charger used. For example, using a 5V/2A charger takes approximately 4.5 hours.
1.2. The DC output voltage can reach up to 16.8V. Will it damage my 12V electronic devices during charging?
The maximum DC output voltage can reach 16.8V, which is consistent with the voltage of the jump starter (ranging from 13.2V to 16.8V, increasing as the battery charge level rises). However, most 12V devices can withstand voltages up to 18V, so no damage will occur.
1.3. Why does the red error indicator light up, the buzzer sound, and the four battery level indicators flash after several start attempts?
This may be due to the jump starter overheating from frequent starts in a short period. Please let the tool rest and try again after 20 minutes.
1.4. How many times can the V1500 start a vehicle after being fully charged?
Up to 25 times. This depends on factors such as engine displacement (load), ambient temperature (discharge capability), and battery charge level (discharge duration).
V2000Pros
1. Function Usage
1.1. How long does it take to charge the jump starter for the first time?
The first charge for the V2000 Pros Jump starter should be at least 8 hours.
1.2. Can it jump start heavy-duty buses and trucks?
It supports 12V cars and trucks. The V2000 supports 10.0L GAS and 8.0L DIESEL, while the V1500 supports 8.0L GAS and 6L DIESEL.
1.3. How many times can the fully charged V2000 Pros be used?
Approximately 25 times, depending on the engine displacement, the number of uses may vary.
1.4. How to use the CP020 Bluetooth mode
- Press the mode switch button on the CP020 battery clamp to switch to the battery test mode. Only the blue LED flashes, indicating that the CP020 is in the Bluetooth pairing stage. Follow the instructions on the BT Mobile App to connect your phone to the CP020. Once connected, the blue LED will stay on.
- Follow the instructions on the App to perform the battery test.
1.5. Can the smart battery clamp be used alone?
The CP010 can detect the battery voltage without connecting to the V2000, and the CP020 can also test the battery alone, including battery test, start test, and charge test.
1.6. Plug in the smart battery clamp, the battery clamp screen
The V2000 Pros has insufficient voltage, please charge it fully before trying again.
1.7. When the V2000 Pros has how much remaining power, it cannot jump start and needs to be charged?
When the smart battery clamp is connected, if the emergency jump starter's fault red light is on, it indicates that the V2000 Pros has insufficient voltage. Please charge the V2000 before starting.
2. Download and Update
2.1. Is there a mobile APP support for Volcano2000pros?
You can search for "BTMobile Pro" on the Google Play Store to download and use.
V Series
1. Function Usage
1.1. How to Calculate Charging Time
The charging time of the device depends on the selected charger. For lithium batteries, it is as follows: Capacity (Wh) = Current (A) × Voltage (V) × Time (h) × 85% (conversion efficiency). For example, the JS3000 (88.8Wh) using a 5V/3A fast charger would require a time of 88.88/(15×3×85%)≈2.32h.
1.2. For our emergency jump starter, through the USB or DC interface, below what current will it not output?
Below approximately 0.1A, it will not output externally.
1.3. Why is the positive cable (red) of the emergency jump starter battery clamp longer than the negative cable (black)?
The design principle of one long and one short is to prevent sparks caused by the positive and negative battery clamps touching each other during the use of BOOST mode (forced output), which could lead to safety hazards.
JS Series
1. Function Usage
1.1. How many times can the JUMPSURGE3000 start a car after being fully charged?
Up to 45 times. This depends on the power of the vehicle's engine and the vehicle's battery.
How long does it take to fully charge the JumpSurge1500?
The time required to fully charge the JS1500 depends on the charger used. For example, a 5V/2A charger takes approximately 4.5 hours.
1.2. How long does it take to fully charge the JUMPSURGE3000?
This depends on the adapter. The adapter provided with the JUMPSURGE3000 is 5V/3A, and its charging time is approximately 6 hours.
1.3. How to turn off the JUMPSURGE3000?
The device will automatically turn off after 10 seconds of inactivity.
1.4. Why does the JS2000 emit a buzzing sound, with the green indicator light on and the battery correctly connected, but fail to start the car?
- The communication pin may not be in good contact. The customer can check if the communication pin on the clamp end is sunken or skewed.
- The product voltage may be too high. The customer can discharge the product by, for example, charging a phone, and try again when the battery is at 75%.
*If the above two methods do not work, then the starting clamp itself is faulty.
1.5. JS3000 Light Status and Abnormal Sound Engagement Reasons
After connecting to the battery, the JS3000 will automatically light up. The BOOST light will automatically turn on, but this light is an output light. As long as the customer's battery is above 6V, it will start to output automatically, and the output light will turn on. Without connecting to the battery, pressing the BOOST mode will light it up, and there will be a relay engagement sound every three seconds, which is a patent avoidance solution.
1.6. How to determine if the JS series emergency starter battery clamp output is normal?
Step 1: Connect the battery clamp to the host and press the BOOST button.
Step 2: Use the positive and negative probes of the multimeter to contact the positive and negative terminals of the battery clamp, and set it to the voltage range. If the detected voltage matches the host voltage, the battery clamp is working normally. If no voltage is displayed, the battery clamp is not working.
1.7. Emergency starters cannot provide long-term low-power supply.
Not supported. The JS series devices are designed to start vehicles, not to provide long-term low-current supply.
1.8. JS3000 Red Light
● Host overheating: The product may overheat after multiple ignitions. It will recover after resting for about 10 minutes.
● Short circuit at the host's interface.
● If the red light turns on immediately upon startup, the device is faulty and needs to be replaced.
1.9. Emergency starters and battery charger clamps may produce sparks when connecting to battery terminals. Our manual includes a spark protection function.
There are many factors that cause sparks during the battery connection process, such as short circuits, reverse connections, and poor contact. Our device generally requires the battery clamp to be stably connected to the battery terminals for spark protection. If the clamp is not stable during connection or if there are burrs on the terminals causing poor contact, sparks may occur. In cases of poor contact, the device cannot trigger the protection mechanism to absorb the high current, resulting in sparks. This is a normal phenomenon and will not affect the battery or the device.
1.10. What are the external manifestations when the JS series emergency starter enters protection mode?
- Reverse polarity protection: The battery clamp lights up with a red indicator.
- Overcurrent protection: The battery clamp lights up with a red indicator, and the buzzer sounds.
- Overheat protection: The four battery level indicators flash.
- Reverse charge protection: No external fault symptoms. When the battery voltage is higher than the starting voltage by a certain value, the output will be disconnected.
- Low-temperature protection: No external fault symptoms. When the temperature is below a certain value, it cannot be charged.
- Short circuit protection: The battery clamp lights up with a red indicator, and the buzzer sounds.
- Over-discharge protection: No external fault symptoms. When the voltage is below a certain value, no current is output.
1.11. What is the JS3000 indicator interaction definition?
Refer to the following content for the indicator interaction definition.
1.12. What does the 4-time start protection of JS3000 refer to?
After 4 starts within 10 minutes, the relay of the intelligent clamp will automatically disconnect, and the red and green indicator lights will alternately flash. It will automatically reset after 10 minutes. During the protection process, any output is prohibited.
1.13. Number of starts possible after a full charge
- JS1200, up to 25 times
- JS2000, up to 35 times
- JS3000, up to 45 times
Note: The number of starts mentioned here refers to laboratory simulation data. The actual number of times the vehicle can be started is related to the degree of battery depletion and the vehicle's displacement. The more the battery is depleted and the larger the displacement, the more supplemental power is consumed to start the vehicle, resulting in fewer starts. Additionally, in cold environmental conditions, the device's discharge capacity will decrease, also leading to a reduction in the number of possible starts.
2. Troubleshooting Issues
2.1. Why does the device lose power so quickly?
There are several factors that affect the rapid power loss of the device:
- Vehicle displacement issue: The larger the vehicle's displacement, the higher the power output required during use, which leads to faster battery consumption.
- Low-temperature environment: The chemical reaction rate of the battery slows down in low temperatures, causing a decrease in battery capacity and output voltage, thereby accelerating power loss.
- Overuse: If the emergency start power source is frequently used to start high-power devices (such as car engines), it will accelerate the energy consumption of the battery. Especially when the battery is already low, the discharge rate may become very fast.
2.2. Why can't the JS series be fully charged, and what troubleshooting steps should be taken?
If the device cannot be fully charged to 100%, it indicates a product issue unrelated to the charger you are using. The device is designed to be compatible with various chargers and should always be able to charge fully, although the charging time may vary.
To troubleshoot, consider the following: You can estimate the charging time using the following formula: Charging time ≈ Battery capacity ÷ Conversion efficiency ÷ Charger power. For example, using a 24000mAh/88.8Wh device and a 15W charger (5V/3A), the charging time ≈ [88.8Wh/85% (conversion efficiency)] ÷ Charger power (P=UI 5V3A, i.e., 15W) = 6.96 hours.
If the actual charging time far exceeds this and the device still does not reach 100%, there may be an issue that requires further investigation.
2.3. What are the troubleshooting steps if the starter cannot start the vehicle?
Troubleshooting steps for a car starter that cannot start:
- Check if the clamps are loose and reconnect if necessary. Ensure the device has more than 50% charge (below 50% may prevent the vehicle from starting). Before attempting to start the vehicle, turn off all power loads, including headlights, radio, and air conditioning.
- If the car battery is completely dead, switch to BOOST mode for forced output. There may be an issue with the vehicle's starting system, such as a faulty alternator or starter. Try jump-starting with another car battery.
- Check if the engine displacement exceeds the device's limit (e.g., JS1200 supports up to 6.5L gasoline engines/4L diesel engines). Ensure the vehicle battery is not 24V, as the device only supports 12V systems.
If the first attempt fails, disconnect the clamps from the car battery, wait at least 20 seconds, and then reconnect. Avoid attempting more than 3 jump-starts within 2 minutes.
*If none of the above methods work, provide a complete video of the process for further assistance.
2.4. Device cannot be fully charged
A. Please replace with a new charger and charge the device overnight.
B. Otherwise, apply for a replacement service and provide the serial number.
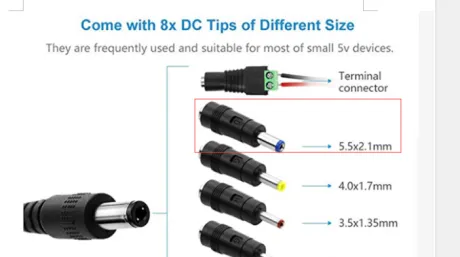
2.5. Specification of the device's DC port
5.5*2.1 mm
2.6. The green indicator light flashes when powered on
The status of the green indicator light indicates that the surface device has triggered low-temperature protection. Please confirm if the ambient temperature is below 0℃. If so, the device will not be able to charge. A temperature above 5℃ is required to resume charging. Additionally, the device's USB output can be used for detection. If it can output current but cannot charge, it means the device has entered low-temperature protection mode.
2.7. How to calculate charging time
The charging time of the device is related to the selected battery charger.
Lithium battery: Capacity (Wh) = Current (A) × Voltage (V) × Time (h) × 85% (conversion efficiency). For example, JS3000 (88.8Wh) with 5V/3A fast charging requires a time of 88.88 / (15 × 3 × 85%) ≈ 2.32h.
2.8. Few starts/rapid power loss
Ask the customer to provide the following information to further confirm if it is a product issue:
- Displacement
- How long the battery has been used, whether the issue is new or old
- Ambient temperature
Also, ask the customer to fully charge the device and test it on this or another vehicle (device performance may decrease by 30%-50% in cold conditions).
2.9. Device cannot be fully charged
A. Please replace with a new 5V/3A or 9V/2A charger and charge the device overnight.
B. If it still cannot be fully charged, provide the serial number for after-sales service.
2.10. Device cannot charge
A. Confirm if the indicator light is on. If not, test with a universal charging cable.
B. Charge for 1-2 hours and try charging other devices to confirm if it is charging.
C. Please confirm if the green light is flashing (the status of the green indicator light indicates that the surface device has triggered low-temperature protection. Please confirm if the ambient temperature is below 0℃. If so, the device will not be able to charge. A temperature above 5℃ is required to resume charging. Additionally, the device's USB output can be used for detection. If it can output current but cannot charge, it means the device has entered low-temperature protection mode).
D. If none of the above works, provide the serial number for after-sales
Related Articles
Troubleshoot - Vehicle jump starting failure
Problem description: The vehicle fails to be started when conencting the device. Tourbleshoot: 1) Poor contact with the clamp. Please disconnect the clamps and reconnect. 2) Whether the power level of the device is higher than 50% (below 50% cannot ...NISSAN OEM Software with RLink Connection Instructions
1. Open the RLink Platform and click Login, it will automatically jump to the login screen upon the first use. Log in to the account bound to the RLink device. Note: After binding and activating the device and downloading the driver, you can use the ...SUBARU OEM Software with RLink Connection Instructions
1. Open the RLink Platform and click Login, it will automatically jump to the login screen upon the first use. Log in to the account bound to the RLink device. Note: After binding and activating the device and downloading the driver, you can use the ...HONDA OEM Software with RLink Connection Instructions
1. Open the RLink Platform and click Login, it will automatically jump to the login screen upon the first use. Log in to the account bound to the RLink device. Note: After binding and activating the device and downloading the driver, you can use the ...TOYOTA OEM Software with RLink Connection Instructions
1. Open the RLink Platform and click Login, it will automatically jump to the login screen upon the first use. Log in to the account bound to the RLink device. Note: After binding and activating the device and downloading the driver, you can use the ...